Sunday, December 30, 2012

White bean salad


Two posts in one day??? What is this madness, you may ask. Well, since I don't have to work, I can cook and then blog about it! Although I'm out of stories for the time being, don't let the brevity of this post fool you. This dish is packed with flavor and very easy. Bon appetit!
Adapted from "Mad Hungry, Feeding Men and Boys"

Ingredients

3 15- ounce cans cannellini beans, drained
1/2 cup chopped red onion
1/2 cup chopped fresh parsley leaves
1/4 cup chopped or torn fresh dill, mint, or basil (I used dill and was very satisfied with the result)
1/4 teaspoon coarse salt
1/4 teaspoon freshly ground black pepper
3 scallions

Rose's Vinaigrette (also adapted from "Mad Hungry")

1 tablespoon minced shallot or garlic
1 teaspoon smooth Dijon mustard
1 teaspoon light brown sugar
1/2 teaspoon coarse salt (the original recipe called for 3/4 teaspoon. I thought this was too salty. Perhaps use the 1/2 teaspoon and add additional salt to taste.)
1/4 teaspoon freshly ground black pepper
1/4 teaspooon Worcestershire sauce
2 1/2 tablespons red wine vinegar
2 tablespoons fresh lemon juice
3/4 cup extra-virgin olive oil

1 - Combine the beans in a large bowl with the red onion, parsley, herb of choice, salt, and pepper.
2 - In the bottom of a clean jar, mash together the shallot, mustard, brown sugar, salt, pepper, and Worcestershire sauce.
3 - Add the vinegar, lemon juice, and olive oil.Cover tightly and shake well to combine and emulsify. Add salt and pepper to taste.
4 - Slowly stir in the dressing to taste. Garnish with the scallions. The salad will keep in the fridge for 3 days.

Vinegar glossed chicken

Tonight we returned from a 10-day Christmas vacation, which was joyful, restful, and a lot of fun. Although we had a great time with friends and family, it was nice to return to my home, hearth and most of all, kitchen!

So, I know a lot of people make resolutions this time of year. I've decided to make one about my blog. Well, more like a resolution about my cookbooks. A few years ago I was somewhat of a nomad, first living at my sister's house for a year and then house sitting for two years. So, the majority of my possessions lived in boxes. Opening those dusty and forgotten boxes three years later was like seeing old friends. As expected, the boxes included many a cookbook.  Unfortunately, I have yet to open a majority of these cookbooks, instead opting to find new recipes on the web. My new years resolution is therefore to revisit these long-forgotten resources and of course share their recipes with you!

Of course like all new year's resolutions, I'm not following my resolution exactly. Since it's not the new year yet, I've decided to start by using a cookbook I was given for my birthday last year by cook extraordinaire Keri. Did I tell you that she chose it because I could never make enough food for Justin's appetite? (Hence the name "Mad Hungry.") And yes, the recipes I've tried have satiated him. Success!

As for the chicken shown above, it was easy and incredibly flavorful. I was surprised how much flavor was infused into the chicken by the vinegar, garlic, and rosemary. Anyways, try it for yourself. You won't be disappointed!

Adapted from "Mad Hungry, Feeding Men and Boys"

Ingredients


1 cup best-quality red wine vinegar
2-3 minced garlic cloves (~2 tablespoons)
3 sprigs of fresh rosemary, chopped (~1 tablespoon)
5 1/2 lbs bone-in chicken pieces (1 used chicken thighs)
Coarse salt and freshly ground black pepper
Extra-virgin olive oil
3/4 cup chicken broth, plus more as needed

1 - At least 15 minutes but up to 2 hour before cooking, combine the vinegar, garlic, and rosemary to marinate.
 2 - Thoroughly season the chicken pieces with salt and pepper. Heat a 14-inch skillet (or two smaller skillets) over high heat and swirl in enough olive oil to coat the bottom of the skillet. Place the chicken in the skillet, skin side down. Don't crowd the chicken; leave space around each piece. Work in batches, if necessary. Make sure to take your time with this part. You should hear an immediate sizzle when the chicken hits the pan. Don't move them, as it takes a couple minutes (4-5) to sear the chicken so the skin will release from the pan. Brown all sides (~10 minutes per batch).
3 - Once finished, return chicken to skillet. Add the chicken broth and scrape up any brown bits from the bottom of the pan. Lower the heat, simmer, and reduce for 15 -20 minutes. Increase the heat to high and pour in the vinegar mixture. Swirl the pan and stir around as the vinegar evaporates to form a simmering glaze, 8-10 minutes. Serve immediately or reheat with some extra chicken broth.

Thursday, December 27, 2012

Cornflake wreath cookies

Every year my sister Jennifer and I lead an intensive cookie baking extravaganza, assisted by dishwasher extraordinaire, err brother in law, Spence. Our maximum number of cookies was 18 some year back. Thankfully we decided to "cut back" this year, deciding to make only 13 delectable kinds. A plate of colorful Christmas cookies is a great way to share Christmas cheer with those around you. Well, unless you're tasked with the job of delivering cookies to shut-ins the morning after the annual hometown pub crawl. Yikes!
Anyways, each family member has his/her "sacred cow" cookie, which cannot be substituted on pain of extended guilt trip. Surprisingly, amid the cherry, chocolate, pecan, and caramel deliciousness, this simple marshmallow cookie that has been made for decades by great aunts and great grandmothers has become my favorite. Now, I usually don't care for marshmallow anything (smores, hot chocolate etc.). Who knows what it is about these cookies; the festive green color (I think we'll try to find an organic food coloring next year if it exists), the cinnamon candies, the fact that it is so darn cute, nostalgia etc. Perhaps we should exclude these delicious morsels next year given the miles and miles I'll have to log running to make up for my extended enjoyment. Oh well, what would Christmas be without a few extra pounds to "celebrate?"

Makes ~2 dozen

1/2 cup butter
4 cups mini marshmallows
1 teaspoon green food coloring
1/2 teaspoon almond extract
1/2 teaspoon vanilla extract
4 cups cornflakes cereal
1 (2.25 ounce) package cinnamon red hot candies

Directions

1. Microwave marshmallows and butter on high for 2 minutes. Stir, then microwave on high for 2 more minutes. Stir. (This can be done using a double boiler if you don't have a microwave like me.)

2. Add the coloring, extracts, and cornflakes and mix quickly. Drop by rounded spoonfuls on greased waxed paper and decorate with 3 red hots each.

3. Once cool, transfer to a lightly greased serving/storage tray with lightly greased fingers.


Tuesday, December 4, 2012

Dill Pickles

Probably one of the strongest food-related memories I have is sitting around my grandparents' Formica table and enjoying some of the dill pickles they canned. The best part was the garlic. Now, I'm sure it was everyone's favorite, but they always let Jennifer and me gobble up the cloves at the bottom. Thirty years later and I have yet to identify a recipe that has too much garlic. As Alton Brown says, "garlic doesn't need an excuse." I feel the same way about cumin!


Ah, I digress. So, for the inaugural foodie Santa's Workshop, I decided to try my hand at pickling. I was fortunate to secure a few of my grandparents' canning supplies, which was pretty cool. Too bad I couldn't find their dill pickles recipe. Regardless, this recipe was fabulous! Easy, not too briny, not too much dill. I consider my first foray into picking a success! Now, even though the 13 steps look complicated, it wasn't that difficult.

Adapted from: http://low-cholesterol.food.com/recipe/blue-ribbon-dill-pickles-241139
Labels obtained here: http://www.myownlabels.com/

Ingredients

7 wide-mouth quart jars, lids & rings  (wide mouth jars are much easier to pack)
fresh dill, heads & several inches of stems
cucumbers, washed, scrubbed (request in bulk from farmers market)
1 garlic clove (or more, duh!)

Brine

8 1/2 cups water
2 1/4 cups white vinegar
1/2 cup pickling salt

Directions:

1 - GET ALL OF THIS GOING BEFORE FILLING THE JARS.
2 - Wash 7 quart jars in hot, soapy water (or dishwasher), rinse and fill with hot water; set aside.
3 - Fill canning kettle half-full with hottest tap water; set on burner over high heat.
4 - In a medium saucepan, fit lids and rings together, cover with water, bring to a simmer.
5 - In a large saucepan, bring water, vinegar and salt to boil; turn off the heat; set aside.
6 - FILL JARS: place a layer of dill at the bottom of each jar, along with one garlic clove (if used), then TIGHTLY load the cukes into the jar to the NECK of the jar (depending on size you may get two nice layers with a few small cukes in the top--)---squeeze cukes into the jar tightly--uniform size helps; add a few TINY spriglets of dill at the top, too, and another garlic clove if desired.
7 - Once jars are loaded, pour in the brine leaving half-inch head space in each jar.
8 - Add lid and ring to each jar, tightening evenly (but not too tight).
9 - Place jars into canner with water JUST to the necks of the jars.
10 - Bring water ALMOST to a boil (about 15 minutes--depending on how fast it heats up).
11 - Remove jars, set on a dish towel on the kitchen counter, cover with another dish towel & let cool.
12 - Check for seal (indented lid), label jars or lids, store in cool dark cellar or cupboard.
13 - NOTES: When washing/scrubbing cukes, sort them into piles by size. This really helps make your jars look nicer and makes for easier packing, too.

Sweet and Spicy Almonds

Santa's Workshop has now closed for the season. That is, after I spent an obscene amount of money shipping packages to all corners of the U.S. and depositing 20 or so gift bags around the greater triangle area. All I can say is that it was way better than the knitting sweatshop that I usually "enjoy."

This year I ended up making seven items for mixing and matching: pepper jelly, dill pickles, spicy pickles, orange cardamom Madelaine cookies, sweet and spicy almonds,  orange bitters, and pure vanilla extract. These almonds were by far the biggest hit. (I swore it would be the bitters.) Some thoughts before I share the recipe: find affordable almonds. I bought in bulk from the local co-op and they were EXPENSIVE. Next year I'm going to buy 25 or so lbs online. Also, this recipe is SUPER easy, hence my lack of fear of multiplying it by10 next year. And yes, as several friends mentioned, these almonds are like crack. You've been warned!!!

Original recipe makes 2.5 cups almonds. This is not enough!

Adapted from allrecipes.com

Ingredients

1/4 cup white sugar
1.5 teaspoons kosher salt
1 teaspoon cayenne pepper
2.5 cups whole almonds
1 tablespoon water
1 tablespoon honey
1 teaspoon olive oil

  1. Preheat an oven to 350 degrees F (175 degrees C). Spread the almonds onto a baking sheet, and toast until the nuts start to turn golden brown and become fragrant, about 10 minutes. Watch the nuts carefully as they bake: they burn quickly.
  2. Stir together the sugar, salt, and cayenne pepper in a mixing bowl; set aside.
  3. Stir together the water, honey, and olive oil in a large skillet over medium heat. Once the mixture begins to bubble, stir in the toasted almonds until evenly moistened. Pour the almonds into the sugar and spice mixture, and toss until evenly coated. Spread onto baking sheets in a single layer, and cool to room temperature.

Sunday, November 18, 2012

Roasted Chipotle Mayo Chicken

 
*GUEST-BLOGGER TIME*

When I cook - which admittedly I indulge in about as often as I do break-dancing - I like to look for recipes which both are filling and full-flavored, hopefully provide a little kick, and, ideally, are not too tough on the wallet. Also, if you're a bit of a novice, like myself, a minimal number of complex steps is a big bonus. (But most important: it should please the wife.)

So, I believe the following recipe, courtesy of the very good homesicktexan.blogspot.com, clears all of these requirements and more. I wholeheartedly recommend! 

Ingredients:
1/2 cup mayonnaise
1 teaspoon lime zest
2-4 canned chipotle chiles (depending on how spicy you like it)
1/4 cup cilantro, chopped
1/4 teaspoon cumin
1/4 teaspoon cayenne
Salt and black pepper to taste
4 chicken legs (thighs with drumsticks), skin on or off—your choice
Lime wedges for serving

Method:
Preheat the oven to 425 degrees and line a 9x13 pan with foil.

In a blender, mix together the mayonnaise, lime zest, chipotle chiles, cilantro, cumin, cayenne until smooth and slightly pink. Add salt and pepper to taste.


I'm a real 'pig' for mayonnaise!
Spread mayonnaise on each leg, place in the pan and cook uncovered for 50 minutes or until juices run clear and the chicken has an internal temperature of 165 degrees. Serve hot with lime wedges.

Yield: 2-4 servings

Monday, November 12, 2012

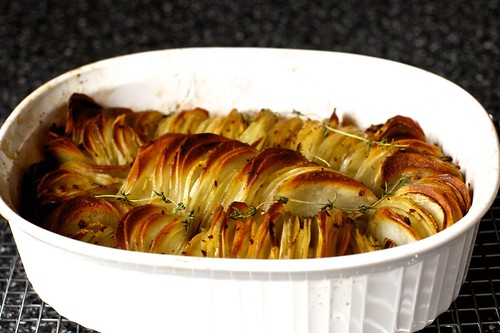
Crispy potato roast

First things first: many thanks to smittenkitchen.com for the wonderful side dish (below) and pictures too. This dish looked really cool before going into the oven. Next time I will definitely get pictures that make it look as good as it tastes. BTW - I used a food processor to slice the potatoes and it worked great.
crispy potato roast
3 tablespoons salted or unsalted butter, melted
3 tablespoons extra-virgin olive oil
Coarse salt
1/2 to 1 teaspoon red-pepper flakes (optional)
4 pounds russet potatoes, peeled (smaller diameter potatoes are great, if you can find them)
4 shallots, peeled (I used 6 or so. I love shallots)
8 sprigs thyme
Garnishes (optional): Bits of goat cheese, crumbles of bacon and/or bits of crisped pancetta
Preheat oven to 375°F. In a small bowl, combine butter and oil. With a sharp knife or mandolin, slice potatoes crosswise very thinly. Figure out what baking dish you’d like to use [see Note above]; Martha suggests a 9-inch round baking dish (a deep dish pie pan would fit this bill) though I think you could go an inch bigger, an oval 1 1/2 to 2 quart casserole dish might also be pretty.
Once you’ve picked the dish that seems the best fit for your slices, pour a tablespoon or so of the butter/oil mixture in the bottom and spread it evenly. Sprinkle the oil mixture with a few pinches of coarse salt and red pepper flakes, if using; this will allow you to season both the top and underside of the potatoes. Arrange your potato slices vertically in the dish.
Thinly slice shallots with your mandolin and slide shallot slivers between potato wedges, distributing them as evenly as possible. Brush with remaining oil/butter mixture. Generously season your dish with salt; go easier on the red pepper flakes, if using. Bake 1 1/4 hours, then arrange thyme sprigs on top and bake until potatoes are cooked through with a crisped top, about 35 minutes more. If casserole seems to brown too fast, cover it with foil to slow it down. Add any garnishes, if using, and serve immediately.

Skillet endives


Desserts, carby sides, main entrees, I enjoy looking through cookbooks and websites to find new and exciting options for dinner. However, I am usually at a loss for vegetable sides. I really don't enjoy making salads and don't know what to do if the veggie selection doesn't include grilled broccoli, asparagus, or green beans, the latter of which Justin just told me he didn't like. :(

I just came across these skillet endives. I've never made (or eaten?) endives before, but thought the pictures in the cookbook were so pretty. So, I was game. These were really good. The small amount of butter was just enough to give a creamy flavor and the savory, slightly bitter taste, was a nice change of pace.

Oh, for those of you who attempt this recipe, don't despair when the endives look like a pile of translucent mush after steaming them for 30 minutes. Mine browned up nicely after I removed the top and boiled off the liquid.

Adapted from Jacques Pepin's cookbook "Fast Food My Way", which I was given as a NPR contributor!

Ingredients
1 tbsp unsalted butter
1 tbsp good olive oil
4 large endives (about 1.5 lb, I got small ones, as large endives were unavailable)
1/2 tea salt
1/2 tea sugar
1 tbsp chopped fresh flat-leaf parsley

Melt the butter in a nonstick skillet and add the oil. Wash the endives and add them whole and still wet to the skillet. Sprinkle with the salt and sugar, cover, and cook over low heat, rutning occasiolally for about 30 minutes, or until the endives are very tender.
Remove the lid and cook over high heat to evatporate any extra liquid. Serve with the juices and a  sprinkling of parsley.


Pecan filled cookies, i.e. November cookie of the month club

It's cookie of the month time again! This month, it is pecan filled cookies. Now, I realize that the only other cookie recipe on this blog is also a pecan cookie. I can't help it, that's what my grandpa likes. These cookies are rich and buttery deliciousness at its best. The pecan flavor is nice, but somewhat subtle. I suggest selecting something different if you're looking for cookies reminiscent to a mini pecan pie.Oh, and before I forget, look at my vintage mixer, straight from my grandma's kitchen. Everything there was in such beautiful condition. I love cooking with it, as she often showed love through food and it reminds me of her.

This recipe was adapted from allrecipes.com
Makes 2 1/2 dozen
  • 1 cup light brown sugar
  • 1 egg
  • 1 teaspoon vanilla extract
  • 2 cups all-purpose flour
  • 1/2 teaspoon baking soda
  • 1/4 teaspoon salt
  • 1/2 cup chopped pecans
  • 1/8 cup sour cream
  • 1/4 cup light brown sugar

Directions


  1. Preheat oven to 350 degrees F (175 degrees C). Grease cookie sheets.
  2. In a medium bowl, cream together the butter and 1 cup brown sugar until smooth. Beat in the egg and stir in the vanilla. Combine the flour, baking soda and salt; stir into the sugar mixture. Roll the dough into 1 inch balls and place them 2 inches apart onto the prepared cookie sheets. Make a depression in the center using the cap from the vanilla or the end of a wooden spoon if you want soft cookies. If you want crunchier cookies, make shallow indentations with the back of a tea spoon. Mix together the pecans, sour cream and 1/4 cup brown sugar; fill each depression with the mixture.
  3. Bake for 8 to 11 minutes in the preheated oven, or until light brown. Cool for a few minutes on the cookie sheets before removing to wire racks to cool completely.

Thursday, November 8, 2012

Election night bibimbap

This is the second U.S. presidential election where I plan a (hopefully) delightful dinner to fuel our 7-hour CNN marathon. This year I pulled from a cookbook ("Mad Hungry") given to me by my dear friend Keri. This was really delightful. I also now know that I am obsessed with kimchi, although it makes the house smell, like, well... not nice. (OK, a baby's dirty diaper, and not the kind that is easy to clean.) But the taste is worth it!

By the way, the cookbook writeup says that this is a Greek/Italian twist on bibimbap. I guess I'll have to hunt down an authentic recipe one day for comparisons. Enjoy!

Ingredients

3 tbsp extra-virgin olive oil
1 cup chopped onion
3 garlic cloves, minced
1.5 lbs ground sirloin (I used 93/7 and it was plenty greasy)
1 tsp minced peeled fresh ginger
1 heaping tbsp grainy mustard
1.25 cups chicken broth
1/2 lb cremini or button mushrooms, sliced
1 tbsp fish sauce
1.5 tsp toasted sesame oil
Splash of rice vinegar (I used more like a few tbsp, but taste as you go)
4 cups cooked rice (jasmine or basmati)
1 lb bok choy or spinach, sliced 1 inch thick
7 oz firm tofu, cubed
6 large eggs
4-5 scallions (both white and green parts), sliced, for garnish
1 jar kimchi (I needed two, since it worked perfectly with this dish)
Sriracha, for serving

Directions

1 - Heat a large pot that has a tight-fitting lid over medium heat. Add the olive oil, onion, and garlic. After it begins cooking, add the meat, increase the heat, and cook for about 5 minutes, stirring occasionally until the meat is browned. Add the ginger and mustard, and continue cooking for 3-5 minutes to carmelize the meat in the bottom of the pan.
2 - Stir in the chicken broth. Add the mushrooms, fish sauce, soy sauce, and sesame oil. Splash in some vinegar.
3- Stir in the rice, bok choy, and tofu. Raise the heat to medium-high. Smoothly tamp the mixture into the pan. Start listening for the "sizzling sound" as the rice crisps up in the bottom of the pan.
4 - When the rice is heated through, make indentations in the top of the mixture for each egg and crack each one into a hole. Cover the pot and steam to cook the eggs. (The directions in the cookbook say 2-3 minutes, but it took me 5-8 minutes to cook the whites and leave the yolks runny).
5 - Sprinkle with scallions and serve with kimchi. Sriracha is also a nice addition.

Sunday, October 28, 2012

Coq Au Vin

Last weekend Justin and I were planning a weeknight dinner with friends and they requested Coq Au Vin. Now, these are probably my most gracious and love-to-host friends (V&J), so of course Justin and I eagerly agreed. Well, he eagerly agreed to pick up beer and I did the rest. OK, he did wipe down all the kitchen surfaces during and afterwards, since I am apparently unable to do this in a manner up to his high standards. I think I just don't try since I know he'll do it anyways! :)
So, I adapted the recipe a bit from the original, adding a lot more bacon and thyme, since I've really never understood subtle flavors! (PS - this is probably the 6th or 8th time I've made this, so you know it's good. And easy!)


Adapted from Cooking Light
  •  6 bacon slices, chopped 
  • 4 (4-ounce) bone-in chicken thighs, skinned
  • 4 (4-ounce) chicken drumsticks, skinned
  • 1/2 teaspoon salt
  • 1/2 teaspoon freshly ground black pepper
  • 1/4 cup finely chopped fresh flat-leaf parsley, divided
  • 1 1/2 cups sliced cremini mushrooms
  • 1 1/2 cups dry red wine
  • 1 cup chopped carrot
  • 3/4 cup chopped shallots
  • 1/2 cup fat-free, less-sodium chicken broth
  • 1 tablespoon brandy
  •  2 teaspoons minced fresh thyme
  • 2 teaspoons tomato paste
  • 1 garlic clove, minced
  • Egg noodles (1 bag should do it)

Preparation

  1. Cook bacon in a large Dutch oven over medium-high heat for 2 minutes. Sprinkle chicken with salt and pepper. Add chicken to pan; cook 2 minutes. Stir in 3 tablespoons parsley, mushrooms, and remaining ingredients; bring to a boil. Cover, reduce heat, and simmer 25 minutes or until chicken is done.
  2. Remove chicken with a slotted spoon; keep warm. Bring cooking liquid to a boil; cook until reduced to 3 cups, or more if you want a gravy-like sauce. While sauce is simmering, begin boiling water for the egg noodles.
  3. Return chicken to pan; cook 1 minute or until thoroughly heated. Sprinkle with remaining 1 tablespoon parsley.
  4. Serve atop egg noodles.

Monday, October 22, 2012

Pepper jelly


Although it is only October, "Santa's Workshop" is in full swing! Wonder what "Santa's Workshop" is? Well, for the past 5 or so years, I've killed myself knitting Christmas presents for friends. One year it was these beautiful felted slippers (http://www.ravelry.com/patterns/library/french-press-felted-slippers). Yeah, they were beautiful until I had to make 10-12 pairs. Yikes, they made quite the mess! Unfortunately I was too burned out to make myself a pair. :(
So, this year I've decided to gift my loved one culinary treats. Actually, it makes it a lot more fun. I've identified 5-6 smallish items to put in gift baskets. Every other weekend (one day only!) I destroy the kitchen in the name of Christmas. Justin is just so grateful that my knitting projects aren't everywhere that he happily helps with the cleaning. So, here is one of the first completed masterpieces!

Labels obtained here: http://www.myownlabels.com/ 
Recipe adapted from: http://www.tasteofhome.com/Recipes/Texas-Jalapeno-Jelly

Ingredients

  • 2 jalapeno peppers, seeded and chopped
  • 3 medium green peppers, cut into 1-inch pieces, divided
  • 1-1/2 cups white vinegar, divided
  • 6-1/2 cups sugar
  • 1/2 to 1 teaspoon cayenne pepper
  • 2 pouches (3 ounces each) liquid fruit pectin
  • Cream cheese and crackers

Directions


  • Place lids and rings in water bath and sterilize over softly boiling water. Sterilize canning jars in dish washer.
  • In a blender or food processor, place the jalapenos, half of the green peppers and 1/2 cup vinegar; cover and process until pureed. Transfer to a large Dutch oven.
  • Repeat with remaining green peppers and another 1/2 cup vinegar. Add the sugar, cayenne and remaining vinegar to pan. Bring to a rolling boil over high heat, stirring constantly. Quickly stir in pectin. Return to a rolling boil; boil for 1 minute, stirring constantly.
  • Remove from the heat; skim off foam.  Carefully ladle hot mixture into hot half-pint jars, leaving 1/4-in. headspace. Remove air bubbles; wipe rims and adjust lids. (Be careful not to tighten lids too much. Fingertip tightening is all you need.)
  • Process for 10 minutes in a boiling-water canner. with water up to neck of jars. Do not overfill jars!
  • Remove from water bath and set on rack. You'll hear a popping sound that means the jars have sealed. 12-24 hours after you've finished, gently press on the center of each jar. If you can push the top down and it springs back with a pop, the jar hasn't sealed and you'll have to reprocess the cans (i.e. boil the lids and rings, place on jars, and reboil for 10 minutes). Make sure the jar lids are perfectly clean.
  • Serve over cream cheese with crackers if desired.  
  • Yield: 14 quarter-pints. 

  •  
  • Note - several folks on the original post mentioned that the jelly did not set. Make sure to follow the recipe directions as noted, especially with regard to the amount of time the pectin is boiled. Happy canning!

Sunday, October 21, 2012

Borscht


The day Justin and I left for our honeymoon we ate a leisurely lunch at Neal's Deli (http://www.nealsdeli.com/), a local spot in Carrboro that is delicious, but only open for breakfast and lunch. So, I rarely get to go. That day at Neal's, I ordered the beet and bacon soup. It was just perfect and I've been trolling the internet trying to find a similar recipe since returning from Spain. I didn't remember much about the soup other than a chicken stock base and the beets and bacon of course! This was my first attempt: borscht. It is a very palatable soup, savory, mild, yet delicious. I was playing offense (i.e. Justin's appetite) and it made A LOT! Like 2 full Le Creusets A LOT ( a double recipe). Guess is who is going to have freezer leftovers?!? As Heidi would say "too big, too big!"

Ingredients:


1 lb medium beets, with ends removed
Salt & pepper
3 tbsp olive oil
6 slices bacon, finely chopped (I splurged on the expensive Whole Food bacon. The smokey flavor was well worth it.)
2 carrots, peels and cut into 1/4 inch dice
2 parsnips, peeled and cut into 1/4 inch dice
3 sprigs thyme (more is better here, i.e. don't choose the daintiest and shortest pieces)
7 cups chicken stock
1/2 head savoy cabbage, shredded (about 3 cups)
3 tbsp red wine vinegar
1 1/2 tbsp honey
1 tbsp caraway seeds
1 granny smith apple (peeled and grated)
1 tbsp fresh dill (chopped fresh dill plus more for garnish)
Sour cream

Directions:

1-Preheat the oven to 400Āŗ.
2-Scrub the beets and put them on a large sheet of aluminum foil; season with salt & pepper, and drizzle with 2 tablespoons of olive oil. Enclose the beets in foil, place them on a baking pan (to prevent dripping), and bake until the beets are tender, about 1 hour. Set aside. When the beets are cool enough to handle but are still warm, peel off their skins and cut them into 1/4-inch dice.

3-In a large heavy bottomed pot set over medium heat, add the bacon and cook until it begins to brown, about 3 minutes. Add the remaining tablespoon of olive oil, the onion, carrots, caraway seeds and parsnips, and cook until the vegetables are softened and just starting to color, about 10 minutes. Add the thyme, stock, cabbage, and beets and simmer until the vegetables are tender, about 20 minutes. Remove the thyme sprgs. Add the vinegar, honey, and apple. Season with salt & pepper.
4-To serve, mix the dill and sour cream. Serve the borscht, hot or cold in bowls, garnished with a dollop of dill and sour cream, and sprinkle with a little fresh dill.
5-The soup can be made ahead up to 2 days and kept covered in the refrigerator. Reheat over medium heat if serving warm. Garnish with the dill and sour cream right before serving.

Monday, October 15, 2012

Red Lentil Curry - Meatless Monday

Recipe adapted from allrecipes.com

Makes 6-8 main dish servings

So, between getting married, going on my honeymoon in Spain (delicious Spanish recipes to follow!), and submitting a grant, I've, well, neglected my blog. However, I got a ton of fabulous cooking swag for my wedding, so I was dying to try something new. This was the perfect dish!

I don't know if I mentioned it earlier, but I have inherited a ton of dry goods from foodie friends that have both (!!!) moved to California. My husband threatens to throw away some of the dustier items since he hates clutter, so my new challenge is to use at least two inherited dry goods per meal. Today I used three: rice, tomato paste, and red chili paste.

Now, this may look like a lot of ingredients, but it's really just measuring out a bunch of spices, so it doesn't take a ton of time. I promise.

Ingredients

2 cups lentils
1 large onion, diced
1 Tbsp vegetable oil
2 Tbsp red curry paste
1 Tbsp curry powder
1 Tsp ground tumeric
1 Tsp ground cumin
1 Tsp chili powder (NOT the kind for chili/stew, i.e. chili powder mixed with cumin etc. You want pure dried chili powder. I used chipotle chili pepper, but ancho or something similar should be nice)
1 Tsp salt
1 Tsp white sugar
1 Tsp minced fresh garlic
1 Tsp ginger root, minced (I doubled this to 2, but it depends on how much you like ginger)
1 14.25 ounce can tomato puree (I substituted 7 oz tomato paste, since that was all that I had)

1 - Wash the lentils in cold water until the water runs clear. Place the lentils in a pot with water to cover and simmer covered until lentils are tender. This won't take more than 10-15 minutes.

2- While the lentils are cooking, carmelize the onions in a Dutch oven. I suggest using a medium-medium low level of heat and stirring often. I prefer the onions to be a nice brown.


3 - While the onions are caramelizing, combine remaining ingredients EXCEPT tomatoes in a mixing bowl. Mix well and add to onions once they're finished carmelizing. Cook over high heat, stirring constantly, for 1 - 2 minutes.


4 - Stir in tomatoes and reduce heat. Add lentils and simmer until lentils are ready.

5 - When lentils are tender, drain and rinse them. Mix into the curry base and serve.
6 - I served this on a bed of rice (oh, how I wish I had a rice cooker!) and fried two eggs to place atop the curry. The great thing is that this is truly a 3-pot meal.

Monday, September 3, 2012

Goat cheese and lentil salad

Justin and I typically have a fridge that is devoid of anything edible except beer and plain Greek yogurt, the latter being the only thing he won't eat, i.e. my new breakfast staple. However, given parent visits, Holly's birth, and parties, our fridge is actually somewhat stocked. Since we're leaving for our honeymoon in a week (Spain), it's time to cook!

I first made this recipe in grad school and it is one of the only recipes I can make from memory. It's an excellent side, easy to make, good for you, and has goat cheese and garlic. Goat cheese and garlic don't need an excuse!


Goat cheese lentil salad

2 cups lentils (uncooked)
1 cup cous cous (uncooked)
4 ounces goat cheese
1 bunch arugula (see instructions for washing below)
1 pint cheery tomatoes
1 bunch basil
2 lemons
3 cloves garlic

Cut off stems of arugula and place in bowl of cold water. Swish around, wait 5 minutes, remove arugula, dump water, rinse bowl and repeat. Trust me - arugula bunches have tons of grit and dirt. Repeat until you can see no sand in the bottom of the bowl. Once finished, remove and drain.

Cover lentils with 2 inches of water. Bring to a boil, cover, remove from heat, and let stand for 1 hour. Boil 1 1/4 cups water. Add cous cous, remove from heat, cover, and let stand 5 minutes. Fluff with fork and pour into bowl. Crumble goat cheese and add to bowl with cous cous. Wait until it warms a bit and stir.

While waiting on the lentils, quarter cherry tomatoes, slice basil and arugula into threads, and mince garlic.


Drain lentils and add to cous cous mixture. Stir. Add juice of one lemon. (I thought 1 lemon wasn't enough acid. Add another if you agree.) Add remaining ingredients, stir, and salt to taste. Yum!


Lemon bundt cake. Or, what to do with 8 lemons.


So, remember when I told you that Justin bought 10 lemons when I only needed 1? Well , I'm still trying to use them. Oh, and the 5 boxes of powdered sugar that friends who recently moved gave me. Of course I turned to my friend smittenkitchen.com for help and came up with this delicious cake. It was moist, not overly rich, and very easy to make. A showstopper! Now, what to do with the leftover buttermilk...


Adapted from ‘Barefoot Contessa Parties!’
Yield: 2 loaf cakes (or one bundt)
2 sticks unsalted butter, at room temperature
2 1/2 cups sugar
4 extra-large eggs, at room temperature
1/3 cup grated lemon zest (6 to 8 large lemons)
3 cups all-purpose flour
1/2 teaspoon baking powder
1/2 teaspoon baking soda
1 teaspoon kosher salt
3/4 cup plus 3 1/2 tablespoons freshly squeezed lemon juice
3/4 cup buttermilk, at room temperature
1 teaspoon vanilla extract
2 cups confectioners’ sugar, sifted.
1. Heat oven to 350 degrees F. Grease and flour two 8 1/2-by-4 1/4-by-2 1/2-inch loaf pans, and line the bottoms with parchment paper.
2. Cream butter and 2 cups sugar in the bowl of an electric mixer fitted with a paddle attachment for about 5 minutes, or until light and fluffy. Mixing at medium speed, add eggs, one at a time, and lemon zest.
3. Sift together flour, baking powder, baking soda and salt in a bowl. In another bowl, combine 1/4 cup lemon juice, buttermilk and vanilla. Add flour and buttermilk mixtures alternately to butter and sugar mixture, beginning and ending with flour. Divide batter evenly between pans, smooth tops, and bake for 45 minutes to 1 hour, until a cake tester comes out clean.
4. Combine 1/2 cup sugar with 1/2 cup lemon juice in a small saucepan, and cook over low heat until sugar dissolves.
5. When cakes are done, let them cool 10 minutes. Invert them onto a rack set over a tray, and spoon lemon syrup over cakes. Let cakes cool completely.
6. For glaze, combine confectioners’ sugar and remaining 3 1/2 tablespoons lemon juice in a bowl, mixing with a whisk until smooth. Pour over top of cakes, and allow glaze to drizzle down the sides.

Corn and chicken soup with chile-mint salsa

Or, this should be more aptly titled "How to trick my mom into eating jalapenos." Last week I had the parents over and I always try to find a recipe that will surprise them. They don't eat things with a lot of heat. This was a perfect nudge toward the spicy dark side.

A friend at work is a great cook and sent me this recipe from Bon Appetit after I sent her a recipe for ice cubes (worth a read! -http://www.food.com/recipe/ice-cubes-420398/review). I don't have any pictures and made this a while ago, so you'll have to excuse the brevity. I can say that this is going into the rotation.

Ingredients

Chile-Mint Salsa

  • 4 jalapeƱos
  • 2 garlic cloves, coarsely chopped
  • 1 teaspoon (or more) kosher salt
  • 1 cup (loosely packed) fresh mint leaves, chopped
  • 3 tablespoons olive oil

Soup

  • 1 3–4-lb. whole chicken
  • 3 quarts low-salt chicken broth
  • 4 ears of corn, husked, kernels cut from cobs, cobs reserved
  • 1 medium onion, halved lengthwise
  • 1 head of garlic, halved crosswise
  • 1 medium carrot, chopped
  • 1 celery stalk, chopped
  • 5 whole black peppercorns
  • 3 bay leaves
  • 2 teaspoons kosher salt plus more
  • 1 small red onion, thinly sliced

Garnishes

  • 1 large tomato, diced, lightly salted
  • Tortilla chips
  • 2 limes, cut into wedges
  • Coarse sea salt (such as Maldon)

Preparation

Chile-Mint Salsa

  • Char chiles over a gas flame or under a broiler, turning occasionally, until blackened all over (this adds a smoky flavor and makes the skins easy to remove). Let cool. Using a small knife, scrape skin from chiles; discard. Coarsely chop chiles (for a milder salsa, discard seeds).
  • Make a paste by mincing garlic and 1 tsp. salt on a work surface, scraping with the side of knife occasionally. Add chiles and finely chop, then add mint and finely chop. Transfer to a bowl; stir in oil. Season with more salt, if desired. DO AHEAD: Salsa can be made 1 day ahead. Cover; chill. Return to room temperature before using.

Soup

  • Place chicken and broth in a large heavy pot. Add water just to cover chicken. Bring to a simmer over high heat, skimming the surface occasionally (foam can add bitter flavors to soup; discard it as you skim). Reduce heat to medium-low; simmer, continuing to skim surface occasionally, for 5 minutes. Add corn cobs, halved onion, garlic, carrot, celery, peppercorns, bay leaves, and 2 tsp. salt. Reduce heat to low and simmer until breast meat is just cooked through, 15–20 minutes.
  • Transfer chicken to a cutting board; let cool slightly. Cut off breast meat; set aside (cooking breast meat longer will make it tough). Return chicken to pot. Simmer over low heat until legs and thighs are cooked through, about 20 minutes longer.
  • Remove pot from heat. Transfer chicken to a platter; let cool slightly. Strain broth through a fine-mesh sieve into another large pot; discard solids. Shred all chicken meat, discarding skin and bones.
  • Bring strained broth to a simmer. Add corn kernels and cook until heated through, about 3 minutes. Add red onion; cook until crisp-tender, about 5 minutes. Add chicken; simmer, stirring occasionally, until heated through, about 5 minutes. Season with salt.

Garnishes

  • Divide soup among warm bowls. Garnish with tomato and tortilla chips. Squeeze lime wedges over; add wedges to soup. Serve, passing chile-mint salsa and sea salt alongside.

Cauliflower cheese pie

My sister just had an adorable baby and of course new babies require food... for the proud parents and grandparents. So, it was my duty, other than to hold little Holly, to bring the sides. Since my sister and her husband aren't the biggest carb fans (it's seemingly genetic, but that will have to wait for another post), I had to be a bit tricksy. Hence the cauliflower pie.


I must admit that I didn't randomly stumble upon this while pretending to do work in the office. Instead, a friend made this and I was able to find a great version online. I cannot say enough about this side dish. It was delicious, not too unhealthy, and unique. Also, I made it a day ahead and warmed it up with no complaints. It was great!


    Potato Crust:
    2 firmly packed cups grated raw potato (I used Yukon gold)
    1/2 tsp salt
    1 large egg, beaten
    1/4 cup grated onion

     Pie:
    2 large eggs
    1/4 cup milk
    3/4-1 tsp. salt
    1/4 tsp freshly milled black pepper
    3 T. unsalted butter
    1 cup chopped onions
    1 garlic clove, finely minced
    1 medium cauliflower, broken into SMALL florets
    2 T chopped fresh parsley
    1 1/2 tsp chopped fresh basil or 1/2 tsp dried
    3/4 tsp chopped fresh thyme or 1/4 tsp dried
    1 3/4 cups grated cheddar cheese
    Paprika (I used a smoky Spanish varietal)

Directions

Potato crust:
Preheat oven to 400 and grease 9" pie pan. Place potatoes in colander, toss with salt and set aside for 10 minutes. Squeeze out excess water by pressing pieces into colander. Combined drained potatoes with egg and onion in medium bowl. Pat mixture into oiled pie pan, building up sides of crust. Bake 35-40 minutes until golden brown, brushing crust with a bit of olive oil after 1st 20 minutes to crisp.

Filling:

Reduce oven to 350 when crust is done. Meanwhile, beat eggs, milk ,1/2 tsp salt, pepper in small bowl. Set aside. Melt butter in large skillet. Add onions, garlic, and 1/4-1/2 tsp remaining salt. Cook, stirring frequently, until lightly browned. Add cauiliflower, parsley, basil and thyme. Cook, covered for 10 minutes, stirring occasionally. Remove from heat.
Over crust, layer 1/2 the cheese, then the cauliflower mixture, then the remaining cheese. Pour the milk mixture over the top and lightly dust with paprika. Bake 35-40 minutes until set.

So, I forgot to take pictures until the last minute!